'분류 전체보기'에 해당되는 글 648건

  1. 2015/04/02 용비 02. Step-0. The Weather Application
  2. 2015/04/02 용비 01. Introduction
  3. 2015/03/31 용비 03. Configuration File's Structure
  4. 2015/03/31 용비 02. Starting, Stopping, and Reloading Configuration
  5. 2015/03/31 용비 01. Preface

프로젝트를 check out 한다. 터미널을 실행하고, 다음 command를 실행한다.

git clone https://github.com/infinispan/infinispan-embedded-tutorial.git

cd infinispan-embedded-tutorial


위의 command를 통해서 git repository에 있는 프로젝트를 local copy하고, 현재 디렉토리를 변경하여 프로젝트의 root 디렉토리에 위치할 수 있다. 이제 Step-0으로 이동해보자.


git checkout -f step-0


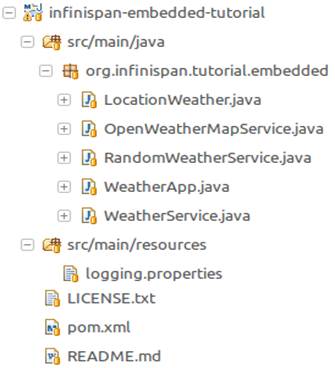
이러한 초기 과정은 우리가 Weather application을 구현한 maven java project를 위한 것이다.  application은 다양한 도시의 현재 날씨 데이터를 얻기 위해 OpenWeatherMap (openweathermap.org) API를 이용한다. 인터넷 연결이 안되거나 문제가 있다면 random weather service를 이용할 수 있도록 pom.xml 파일내에 있는 주석을 해제하라. 이 초기 과정은 dependency가 전혀 없고, JDK logging을 사용한다. 다음 이미지는 프로젝트의 구성도를 보여준다.
사용자 삽입 이미지

컴파일하고 실행해 보자

mvn clean package


Maven command-line으로 실행한 2개의 goal (clean, package)을 순서대로 실행할 것이다.  첫번째 goal (clean)은 이전에 생성된 파일을 지우고, 두번째 goal (package)은 프로젝트를 컴파일하고 unit test를 실행하고,컴파일한 code jar 파일로 package할 것이다. 이제 우리는 code를 실행해 볼 수 있다. WeatherApp Classmain() method WeatherService를 초기화하고 list에 있는 도시의 현재 온도를 두 번 읽어온다. 그리고 list에 있는 도시의 데이터를 모두 얻어오는데 걸린 경과 시간을 출력한다. 현재 단계에서는 cache가 없으므로, application은 매번 데이터를 얻어와야 하기 때문에 정말 느리다.


mvn exec:exec


[output]

---- Fetching weather information ----
Rome, Italy - Temperature: 12.9° C, Conditions: light rain
Como, Italy - Temperature: 6.3° C, Conditions: Sky is Clear
Basel, Switzerland - Temperature: 0.8° C, Conditions: overcast clouds
Bern, Switzerland - Temperature: -1.6° C, Conditions: broken clouds
London, UK - Temperature: 1.8° C, Conditions: light rain
Newcastle, UK - Temperature: 2.6° C, Conditions: scattered clouds
Bucharest, Romania - Temperature: 9.3° C, Conditions: scattered clouds
Cluj-Napoca, Romania - Temperature: 6.4° C, Conditions: scattered clouds
Ottawa, Canada - Temperature: -7.0° C, Conditions: overcast clouds
Toronto, Canada - Temperature: -7.0° C, Conditions: broken clouds
Lisbon, Portugal - Temperature: 14.6° C, Conditions: overcast clouds
Porto, Portugal - Temperature: 12.2° C, Conditions: moderate rain
Raleigh, USA - Temperature: 3.9° C, Conditions: Sky is Clear
Washington, USA - Temperature: 3.4° C, Conditions: light rain
---- Fetched in 2210ms ----
---- Fetching weather information ----
Rome, Italy - Temperature: 12.9° C, Conditions: light rain
Como, Italy - Temperature: 6.3° C, Conditions: Sky is Clear
Basel, Switzerland - Temperature: 0.8° C, Conditions: overcast clouds
Bern, Switzerland - Temperature: -1.6° C, Conditions: broken clouds
London, UK - Temperature: 1.8° C, Conditions: light rain
Newcastle, UK - Temperature: 2.6° C, Conditions: scattered clouds
Bucharest, Romania - Temperature: 9.3° C, Conditions: scattered clouds
Cluj-Napoca, Romania - Temperature: 6.4° C, Conditions: scattered clouds
Ottawa, Canada - Temperature: -7.0° C, Conditions: overcast clouds
Toronto, Canada - Temperature: -7.0° C, Conditions: broken clouds
Lisbon, Portugal - Temperature: 14.6° C, Conditions: overcast clouds
Porto, Portugal - Temperature: 12.2° C, Conditions: moderate rain
Raleigh, USA - Temperature: 3.9° C, Conditions: Sky is Clear
Washington, USA - Temperature: 3.4° C, Conditions: light rain
---- Fetched in 1820ms ----


다음 단계에서 수행하는 작업은 더 흥미로울 것이다.


받은 트랙백이 없고, 댓글이 없습니다.

댓글+트랙백 RSS :: http://www.yongbi.net/rss/response/667

Embedded Infinispan Java Application Tutorial (Infinispan 7.1.1.Final)

Introduction


Java Application infinispan embed하는 방법을 배우고 싶다면 올바로 찾아온 것이 맞다. turorial local-only instance 시작해서 fully clustered application 이르기까지 infinispan-based application 작성하는데 필요한 모든 단계들에 대해서 Guide 것이다. 작성할 application 빠른 정보 제공을 위해 특정 도시의 현재 날씨 정보를 가져와서 cache 저장할 것이다. 또한 cache 저장된 데이터의 유효기간을 어떻게 설정하는지, 정보들이 유효기간에 맞춰 제거되는지를 보여줄 것이다. 그리고 Multiple node 대한 Cluster 구성은 어떻게 하는지, cluster 내에서 event들에 대해서 어떻게 반응하는지를 설명할 것이다. 끝으로, 국가별 평균 온도의 계산을 통해 강력한 map/reduce 기능을 보여줄 것이다.


tutorial 위해서는 다음 환경이 필요하다.

  • JDK 1.7 이상
  • Maven 3.2 이상
  • IDE (ex. Eclipse) or Text Editor
  • Git

tutorial command-line 통해 다양한 command 실행할 있다는 것을 가정하고 작성되었다. Tutorial 있는 code GitHub 통해 Step별로 프로젝트로 제공된다. 따라서, 여러분들은 Step에서 다음 Step으로 진행 , 코드의 변경 사항을 쉽게 파악할 있다.


, 그럼 이제 첫번째 Step으로 이동해 보자.

받은 트랙백이 없고, 댓글이 없습니다.

댓글+트랙백 RSS :: http://www.yongbi.net/rss/response/666

<설정 파일 구조>

Nginx 설정 파일 내의 directive(지시어)들에 의해 제어되는 모듈들로 이루어져 있다. Directive simple directive(단순 지시어) block directive(블록 지시어) 나누어져 있다. Simple directive space 구분되는 name, parameter 구성되어 있고, semicolon(;)으로 끝난다. Block directive simple directive 동일한 구조를 갖지만, semicolon으로 끝나는 대신에 괄호로 묶인다. (중괄호 사용 : '{' '}') Block directive 괄호 안에 다른 directive들을 가질 있다. 이것을 context라고 부른다. (ex. Events, http, server, location)


설정 파일에서 Context 밖에 위치하는 directive들은 main context 있는 directive 간주한다. Events, http main context 위치하고, http 안에 server 있고, server 안에 location 있다.


#표시 뒤에 오는 라인은 comment이다.

TAG
받은 트랙백이 없고, 댓글이 없습니다.

댓글+트랙백 RSS :: http://www.yongbi.net/rss/response/665

<Starting, Stopping, and Reloading Configuration>

Nginx 실행파일을 실행하여 시작한다. Nginx 실행된 이후에는 -s 파라미터를 가지고 다른 작업을 수행하도록 있다. 다음과 같은 문법을 갖는다.


nginx -s signal


Signal 다음 값을 가질 있다.

Stop : fast shutdown

Quit : graceful shutdown

Reload : 설정 파일 reload

Reopen : 로그 파일 reopen


예를 들어 현재 처리 중인 request 모두 처리하고 nginx 종료하고자 한다면 다음 command 실행하면 된다.


nginx -s quit


  • command nginx 실행할 때와 동일한 user 실행해야 한다.

설정 파일의 변경은 변경된 설정 파일을 reload command 통해서 nginx 전달해야 적용된다. 설정 파일을 reload하는 command 다음과 같다.


nginx -s reload


Master Process 설정 파일 reload signal 받으면 새로운 설정 파일에 대한 syntax validation 체크하고, 적용한다. 적용이 끝나면 master process 새로운 worker process 실행하고, 기존의 worker process에는 shutdown 요청을 보낸다. 과정 중간에 오류가 발생하면 master process 변경 사항을 roll back하고 계속해서 old worker process 작업을 수행한다. Old worker process shutdown 메시지를 받으면 새로운 connection 받는 것을 중지하고 현재 처리 중인 request 완료될 때까지 계속해서 서비스를 제공한다. 모든 처리 중인 request 완료되었을 , old worker process 종료된다.


Signal kill utility 같은 Unix tool 도움을 받아서 nginx 전달될 수도 있다. 경우 signal 주어진 process ID 통해서 직접적으로 nginx process에 전달된다. Process ID로는 nginx master process ID 사용한다. 기본적으로 nginx.pid /usr/local/nginx/log 폴더나 /var/run 폴더에 저장된다. 예를 들어서, master process ID 1628이라면, nginx graceful shutdown 위한 Quit signal 다음과 같이 보낼 있다.


kill -s QUIT 1628


모든 기동중인 nginx process 대한 리스트를 얻으려면 다음과 같이 ps utility 사용할 있다.


ps -ax | grep nginx


Nginx 보내는 signal 대한 자세한 정보는 Controlling nginx (http://nginx.org/en/docs/control.html) 통해서 얻을 있다.

TAG
받은 트랙백이 없고, 댓글이 없습니다.

댓글+트랙백 RSS :: http://www.yongbi.net/rss/response/664

01. Preface

Nginx/02. Begninner's Guide 2015/03/31 13:23 용비

[여기에 있는 내용은 Nginx 홈페이지(http://nginx.org/en/docs/beginners_guide.html)에서 제공하는 초보자용 가이드(Beginner's Guide) 문서를 번역한 것이다. 원문 참조를 원한다면 홈페이지를 참조하기 바란다.]


가이드에서는 nginx 대한 개본적인 소개와 nginx 통해 수행할 있는 간단한 task들에 대해서 설명하고 있다. 독자들의 컴퓨터에 nginx 이미 설치되어 있다고 가정하고 있는데, 아직 설치되어 있지 않다면 Installing nginx (http://nginx.org/en/docs/install.html) 페이지를 참고하기 바란다. 가이드를 통해서 nginx start, stop, reload, nginx 설정 파일의 구조, nginx 통해서 static content 제공하는 방법, proxy server 설정하는 방법, FastCGI application 접속하는 방법들을 설명하고자 한다.


Nginx 하나의 master process 여러 개의 worker process 가지고 있다. Master process 주요 기능은 configuration 읽어서 처리하고, worker process들을 유지/관리하는 것이다. Worker process request 대한 실제 처리 작업을 수행한다. Nginx event-based model 채택했고, worker process 효율적인 request 분산을 위해서 OS-dependent mechanism 가지고 있다. Worker process 숫자는 설정 파일에 정의된다. 이용 가능한 CPU core 수에 맞춰서 자동으로 할당되거나 설정 파일에 정의된 값으로 고정된다.


Nginx nginx 모듈들의 작업은 설정 파일에 의해서 결정된다. 기본적으로 nginx 설정 파일 이름은 nginx.conf이고, 위치는 /usr/local/nginx/conf /usr/local/etc/nginx이다.

받은 트랙백이 없고, 댓글이 없습니다.

댓글+트랙백 RSS :: http://www.yongbi.net/rss/response/663