'Articles'에 해당되는 글 116건

  1. 2019/06/17 용비 CentOS 7.4 SFTP 설정
  2. 2019/06/17 용비 CentOS 7.4 에서 Nexus 설치
  3. 2019/06/14 용비 CentOS 7.4에서 gitlab 제거
  4. 2019/06/13 용비 CentOS 7.4에 gitlab 설치하기
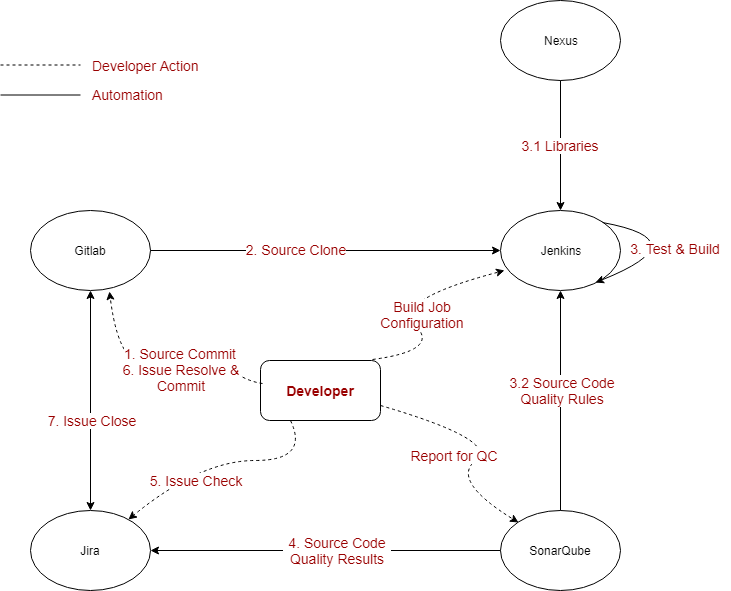
  5. 2019/04/25 용비 Continuous Integration Environment Reference Model

CentOS 7.4 SFTP 설정

Articles 2019/06/17 20:37 용비
1. sftp user creation
  • create the user
sudo adduser access
  • assign a password to the new user
sudo passwd access

2. Create Directory for File Transfer
  • create the directory for file upload
sudo mkdir -p /var/sftp/uploads
  • establish the root user as owner
sudo chown root:root /var/sftp
  • grant write permissions to the root user and read to the other users
sudo chmod 755 /var/sftp
  • modify the owner of uploads to be the user access
sudo chown access:access /var/sftp/uploads

3. Restrict Directory Access
  • restrict the access by the terminal to the user access
sudo vi /etc/ssh/sshd_config
  • In the final part of the file, add followings
Match User access

ForceCommand internal-sftp
PasswordAuthentication yes
ChrootDirectory /var/sftp
PermitTunnel no
AllowAgentForwarding no
AllowTcpForwarding no
X11Forwarding no
  • Save the changes using the key combination
ESC + :wq
  • apply the changes in SSH
sudo systemctl restart sshd

4. Verify SSH Connection
  • SSH connection
ssh acces@{server_ip}
         ==> The result is verified that the connection will be closed through SSH
  • Use the sftp protocol
sftp access@{server_ip}


받은 트랙백이 없고, 댓글이 없습니다.

댓글+트랙백 RSS :: http://www.yongbi.net/rss/response/847

CentOS 7.4 에서 Nexus 설치

Articles 2019/06/17 13:19 용비
<기본 환경>
CentOS 7.4.1708

<Base Command>
OS Terminate : systemctl power-off (--force)
OS Reboot : systemctl reboot (--force)
<Network Configuration>
Ethernet Card 확인 : nmcli d

<DHCP 설정>
nmtui
service network restart
ip addr
yum check-update
yum update

<Pre-requirements>
Nexus : 3.16.2-01 Version
Java : OpenJDK 1.8

<Installation of Nexus>
1. Java 버전 확인
java -version
설치되어 있지 않을 경우,
yum -y install java-1.8*
2. OS 방화벽 설정
firewall-cmd --permanent --add-service=http
firewall-cmd --permanent --add-service=https
systemctl reload firewalld (or firewall-cmd --reload)
만약 작업 도중, firewall-cmd 명령어가 실패하면 firewalld 서비스 설치 필요
yum -y install firewalld
systemctl unmask firewalld
systemctl enable firewalld
systemctl start firewalld
3. Nexus Default Port 방화벽 설정
firewall-cmd --permanent --add-port=8081/tcp
firewall-cmd --reload
만약, ERROR: Exception DBusException: org.freedesktop.DBus.Error.AccessDenied 오류가 발생하면,
yum -y install system-config-firewall
system-config-firewall-tui --> Firewall Enabled Check
systemctl start firewalld
systemctl status -l firewalld
이후 방화벽 설정 작업 다시 시도.
그래도 실패하면, 시스템 재시동 (reboot) 이후 작업하면 정상 동작함.

4. Nexus Download
wget --no-check-certificate https://download.sonatype.com/nexus/3/latest-unix.tar.gz
mv latest-unix.tar.gz nexus-3.tar.gz
wget이 정상 동작하지 않을 경우,
yum -y install wget
5. Nexus Extraction and Installation
mkdir /opt/nexus_dir
mv nexus-3.tar.gz /opt/nexus_dir
cd /opt/nexus_dir
tar zxvf nexus-3.tar.gz
6. Nexus Start
cd /opt
chmod -R 777 nexus_dir
/opt/nexus_dir/nexus-3.16.2-01/bin/nexus run
7. References
https://help.sonatype.com/repomanager3/installation
https://help.sonatype.com/learning/repository-manager-3/first-time-installation-and-setup
https://conory.com/blog/42523

받은 트랙백이 없고, 댓글이 없습니다.

댓글+트랙백 RSS :: http://www.yongbi.net/rss/response/846

CentOS 7.4에서 gitlab 제거

Articles 2019/06/14 15:47 용비
설치되어 있는 gitlab을 제거하기 위해서는 다음과 같은 순서로 실행한다.
gitlab-ctl cleanse
gitlab-ctl uninstall
yum remove gitlab-ce

받은 트랙백이 없고, 댓글이 없습니다.

댓글+트랙백 RSS :: http://www.yongbi.net/rss/response/845

Gitlab을 설치할 서버 OS 버전 : CentOS Linux release 7.4.1708 (Core)
설치할 Gitlab Version 및 Intallation Guide : https://about.gitlab.com/install/#centos-7

1. 사전 확인 작업 (안해도 됨)
Swap 파티션을 추가하고, swappiness를 설정한다.
sudo dd if=/dev/zero of=/swapfile count=4096 bs=1M
sudo chmod 600 /swapfile
sudo mkswap /swapfile
sudo swapon /swapfile
echo '/swapfile   none    swap    sw    0   0' | sudo tee -a /etc/fstab
free -m
시스템 성능을 위해서 kernel swappiness 설정은 10이하로 유지하는 것이 좋다.
echo 'vm.swappiness=10' | sudo tee -a /etc/sysctl.conf
sudo sysctl -p
cat /proc/sys/vm/swappiness
필요할 경우, 도메인을 설정한다.


2. 방화벽 설정
sudo firewall-cmd --permanent --add-service=http
sudo firewall-cmd --permanent --add-service=https
sudo systemctl reload firewalld

만약, 설치 도중 [bash: firewall-cmd: command not found]과 같은 메시지가 뜬다면,
다음과 같이 firewalld를 설치해 주어야 한다.
sudo yum install -y firewalld

설치 완료 후, firewalld를 시작한다.
sudo systemctl unmask firewalld
sudo systemctl enable firewalld
sudo systemctl start firewalld

HTTP에 대한 방화벽 작업을 다시 설정한다.
sudo firewall-cmd --permanent --add-service=http
sudo firewall-cmd --permanent --add-service=https
sudo systemctl reload firewalld

3. Notification Email을 위해서 postfix를 설치한다.
sudo yum install postfix
sudo systemctl enable postfix
sudo systemctl start postfix
만약, 외부 메일을 사용한다면 postfix 설치는 Skip하고 외부 SMTP 메일 서버를 설정한다.
아래는 gmail 설정 예제이다.
vi /etc/gitlab/gitlab.rb

gitlab_rails['smtp_enable'] = true
gitlab_rails['smtp_address'] = "smtp.gmail.com"
gitlab_rails['smtp_port'] = 587
gitlab_rails['smtp_user_name'] = "my.email@gmail.com"
gitlab_rails['smtp_password'] = "my-gmail-password"
gitlab_rails['smtp_domain'] = "smtp.gmail.com"
gitlab_rails['smtp_authentication'] = "login"
gitlab_rails['smtp_enable_starttls_auto'] = true
gitlab_rails['smtp_tls'] = false
gitlab_rails['smtp_openssl_verify_mode'] = 'peer'
# Can be: 'none', 'peer', 'client_once', 'fail_if_no_peer_cert', see http://api.rubyonrails.org/classes/ActionMailer/Base.html

자세한 정보는 https://docs.gitlab.com/omnibus/settings/smtp.html 에서 확인 가능

4. Repository에서 gitlab package 설치
<Enterprise Version>
curl -sS https://packages.gitlab.com/install/repositories/gitlab/gitlab-ee/script.rpm.sh | sudo bash
yum install gitlab-ce

<Community Version>
curl -sS https://packages.gitlab.com/install/repositories/gitlab/gitlab-ce/script.rpm.sh | sudo bash
yum install gitlab-ce

5. cur : (60) Peer's Certificate issuer is not recognized. 오류 발생 시
rpm을 직접 다운로드 받아서 설치한다.
<rpm 다운로드>
wget --no-check-certificate --content-disposition https://packages.gitlab.com/gitlab/gitlab-ce/packages/el/7/gitlab-ce-11.11.3-ce.0.el7.x86_64.rpm/download.rpm
<rpm 설치>
rpm -i download.rpm

6. gitlab 설정 변경 및 방화벽 오픈
<gitlab 설정 변경>
vi /etc/gitlab/gitlab.rb
external_url 'http://localhost' --> external_url 'http://{server ip}'
gitlab은 기본적으로 80포트를 사용하고, 내부 인증으로는 8080을 사용한다.
따라서 80포트에 대한 방화벽 오픈이 필요하다.
firewall-cmd --permanent --add-port=80/tcp
firewall-cmd --reload
7. gitlab 설정 변경 적용
마지막으로 변경된 gitlab 설정을 적용한다.
gitlab-ctl reconfigure
8. 최초 로그인
설치가 성공하면, 해당 서버의 IP를 치고 들어갔을 경우 비밀번호를 변경하게 된다.
관리자 계정의 비밀번호에 해당하므로, 비밀번호 변경 후 [root / 변경비밀번호]로 로그인한다.


9. 참조 Sites.


받은 트랙백이 없고, 댓글이 없습니다.

댓글+트랙백 RSS :: http://www.yongbi.net/rss/response/844

기본적인 Continuous Integration 환경에 대한 다이어그램
사용자 삽입 이미지

받은 트랙백이 없고, 댓글이 없습니다.

댓글+트랙백 RSS :: http://www.yongbi.net/rss/response/843